Friday, August 9, 2013

My FAVORITE protein pancakes

I love breakfast food. I love it for breakfast, lunch, dinner and sometimes a late night snack.  But,  that doesn't always translate as something healthy or nutrient dense.

For instance, your typical buttermilk pancakes might offer you that cozy feeling when you eat them. Syrupy, filling and lots of butter.  But they have little nutrition, a lot of carbs and usually a lot of sugar after you douse them in maple syrup.  Typical pancakes always leave me hungry an hour later.

In my search for the perfect pancake alternative to those fluffy golden circles of buttermilk and maple syrup goodness-  I came up with the 'protein pancake'.

Here is what you will need:

Protein pancake (makes 1 pancake) 

-1/3 cup old fashioned oats
-1/3 cup egg whites
-1/3 cup reduced fat cottage cheese ( I HATE cottage cheese. You can not taste it in this recipe at all.)
-1/4 tsp cinnamon
-1/4 tsp baking powder
-1/4 tsp vanilla extract
 (optional) honey, maple syrup, fresh fruit- for topping
 

All ingredients!

Add all your ingredients in your blender.  Blend until smooth (I always start slow until the ingredients combine, then turn up the blender speed a little).  This should take no longer than 40 seconds.
Pour your 'batter' into a hot pan (I usually turn it on while i'm blending up the batter).  Always use a little cooking spray so things don't stick!


It's cooking!

As you would with normal pancakes, wait until the 'bubbles' start to stick and then flip it. 

After the 'flip,' I'm a horrible pancake flipper!

Finished product!

I added a drizzle of tupelo honey ( which the pancake soaked up)

This is one of my favorite 'go-to' recipes. It is quick, yummy and packs around 25 grams of protein in just one pancake. It is also under 300 calories ( before adding honey or other toppings).  They taste a lot like french toast, but in pancake form.  You would have no idea that this pancake could be good and good for you.

Other options for this pancake include...
-adding berries into the batter (once poured in pan)
-adding pumpkin puree to the batter ( in the blender) for a pumpkin protein pancake.  I'd add a little pumpkin pie spice for this to.
-adding pieces of turkey bacon into the pancake (once poured in the pan)


 I hope you give my protein pancakes a try!

Peace, love and pancakes for everyone,
Caitlin


Monday, August 5, 2013

Pittsburgh adventures

This blog post will document my ideal Sunday.  Which is heading up to Wexford, Pa. for lunch, grocery shopping at Whole Foods....and ice cream on the way home.

I have been so forgetful about taking pictures for my blog lately, but I still think I did okay for this one.  You guys will have to let me know what you think!

For lunch, we went to one of my favorite places, Walnut Grove in Wexford, Pa.  It's just outside Pittsburgh.  http://walnutgroverestaurant.com/

From the outside, the restaurant almost looks like a chain restaurant.  While they do have a few locations- the food there is FAR from any chain/cookie cutter restaurant I have been to.  We got there around 2:30, which is perfect for me.  I like sneaking in while restaurants aren't packed and the server not distracted with several other tables.  

The menu has 2 sides ( but I forgot to take a picture of the other side).  I have never had anything bad at Walnut Grove.  Everything is always fresh, quality ingredients and there is a little something for everyone.

After a long work week, nothing better than some white sangria for me (left)!  The sangria was fruity, with hints of peach, and several pieces of citrus fruit in the glass.  It was light and fruity, perfect for a Sunday afternoon lunch!

I started with the strawberry balsamico salad.  This salad features Mesclun greens topped with strawberries soaked in balsamic vinegar, a sprinkle of goat cheese and sliced almonds.  For anyone who hasn't experienced balsamic strawberries- the vinegar actually enhances the flavor of the berries and takes on a whole new flavor profile. The berries become sweet and tangy ( they are even good over ice cream!)

Another salad we had was the caramelized walnut salad which has pears, caramelized walnuts, goat cheese, and sundried cranberries over a bed of field greens.  It is served with an herb balsamic vinaigrette.  We topped this one with some chicken for added protein.

Another item we had was the seared tuna tacos. The tacos had sesame crusted tuna, avocado, Asian slaw and topped with a chipotle aoili. 
Just to keep it balanced, I also had the sweet chili boneless wings.  I'm not one to usually eat chicken wings, but these are probably my favorite.  The texture is closer to that of a traditional chicken wing, rather than the glorified chicken nuggests you get in most restaurants.  The sauce is tangy, sweet and has a little heat from the chili peppers.  I don't like wings that are overly sauced.  Its more of a smoky/spicy barbeque sauce than a tradition buffalo wing sauce.  No weird grisly parts to the meat either- these are all white meat and delicious!

When we got to Whole Foods, I had the complete intention of documenting the entire process.  I was even going to do a few little videos.  But, I got a little overexcited and completely abandoned my phone while grocery shopping.  I only remembered by the time we got to check out. I bought lots of strawberries, blueberries, coconut creamer, power greens, apples, bananas, lemons, greek yogurt, butternut squash ravoli.  I'm getting hungry just thinking about it!

This is generally what I get at Whole Foods (plus some that wouldn't fit on the check-out belt).  I like going there because of the high quality produce and their organic selection.  I don't have to sift through reading every single label and wondering if I'm consuming something GMO ( although I still check). This trip, I got a few Blueprint Juices.  While expensive, these juices are raw and pressed.  Meaning they keep all their enzyme properties and nutrients- which can be lost when juice is pasteurized.  The Blueprint company is based out of New York and originally was only available for home delivery of their 'cleanses'.  I enjoy drinking the juice regularly and I LOVE that I can pick it up at the store- without having to special order it. The Pineapple, apple and mint is one of my favorites.  But I also got their cashew milk and beet, carrot and ginger blend as well.  YUM! Check out their website and the benefits of their juices here http://blueprintjuice.com/ or http://blueprintcleanse.com/

We wound the trip down by heading to Sarris Chocolate Factory in Canonsburg, PA for some ice cream Sundaes on a Sunday ( get my little joke?)

Big candy displays!

The chocolate castle! 

(this was new) a white chocolate lady.


The sundae 'before'. (1 scoop vanilla topped with hot fudge, 1 scoop chocolate topped with marshmallow, whipped cream, chocolate sprinkles, 2 cherries and 2 wafer cookies on the side!) 
The sundae after. Even between 2 people we couldn't finish it! (obviously I will be in the gym tomorrow regretting this)


I had a fantastic food trip to Pittsburgh! I'll do my best to get some more blogging done for my fellow foodies!  Hopefully using some of the wonderful things I got at Whole Foods during this adventure!

Peace, love and lots of sprinkles,
Caitlin

Saturday, June 8, 2013

Cozy, comforting vegan brown rice pudding

Every now and then I crave sweets, but I don't keep them around the house.  Earlier this week, I had eaten a fabulous dinner of grilled chicken and veggies topped with a light dressing of garlic, extra virgin olive oil and a little white wine vinegar.  I have been working out  hard and felt I earned a little treat.

I frantically began searching my mostly empty pantry. I knew I was going to have to put something together, but didn't want just anything.  I also don't like to eat empty calories.  If I'm going to eat something, I want it to have some benefit to my body.  Your body is not a trash can, so don't treat it like one.

I remember my grandmother making rice pudding for my grandfather.  I remember how he would warm it up slightly and top it with milk and raisins. I wanted to make that.  I wanted something simple, comforting and cozy.

Vegan brown rice pudding

In this recipe I used: 1 can full fat coconut milk, around 1 tablespoon of sugar, a teaspoon of vanilla and a few dashes of cinnamon.

I added all of those ingredients to roughly 2 cups of cooked brown rice.  I make brown rice in large batches in my rice cooker.  I keep it around, already made, for easy breakfast dishes and quick stir-frying.
Good coconut milk will separate, due to its high fat content.  Make sure when adding it to the rice to break any chunks up and ensure it is incorporated into the rice.  (Also add your sugar, cinnamon and vanilla.  These you could add more or less of any of those ingredients, depending on what flavor and level of sweetness you are looking achieve). 
  • Bring the mixture to a boil, then reduce to medium low heat- or until it is simmering.  Your goal is to cook out some of the water in the mixture so that it will thicken, creating a pudding like texture.  Get comfortable and prepare to stand by your range for at least 30 minutes.  You need to be stirring it consistently so that it does not burn to the bottom of the pan.  *If you have ever made steel cut oats or oat groats, the process is almost identical*
  • The pudding will slowly come together and have a more 'rice pudding' like texture.  You can make it as thin or as thick as you like- by controlling how much liquid you cook out of the pudding.

The finished product.  It might not look like much, but it was DELICIOUS.  It was low in sugar, and had fiber and protein because of the brown rice.  While full fat coconut milk is dairy-free and tasty, I don't recommend eating large portions of it.  It's great as a treat, but it has a high saturated fat content and certainly packs a punch with calories.
I LOVED this pudding.  I still have lots left over. It is very filling and it reminded me a little bit of creme brulee.  The little ramekin pictured holds around 5 ounces or so, I might have eaten a total of 2.  As I said, this little dish is rich and filling.

This pudding also would have been fantastic if a vanilla bean had been used in the cooking process or even topping it with nuts.


....in other news.

My coffee came in.  I use a coffee subscription service called Tonx.  I LOVE LOVE LOVE it.  I am very particular about food (shocking, I know) and even more particular with coffee. I hate stale coffee, I hate over roasted coffee *ahem starbucks*, I hate not knowing where my coffee is sourced from.

I love the coffee from Mountain Roasters ( in Buckhannon, W.Va.) but its not always easy to get my hands on.  

In a caffeine deprived state, I also don't like to concern myself when I'm running out of those chocolaty little beans of happiness. 

Enter: Tonx

Tonx allows me to get FRESH coffee sent to me twice a month.  I get something new and fresh every 2 weeks.  They source, roast and ship the coffee.  It is packaged and mailed out so that the beans reach you at their peak flavor (24-72 hours after roasting).  I also love that I get a little background on where the beans came from, why they matter, who they are supporting.  Its kind of like getting a surprise gift from myself twice a month in the mail.


I know it all seems like a shameless product promotion, but its not, I really do love this stuff.  I REALLY love not worrying about running out of good coffee.

Tonx is a great company and are easy to get a hold of.  I e-mail them frequently with coffee questions and they always get back to me promptly. Their customer service is top notch.

They offer a trail of 2 free ounces of coffee, and will mail it to you.  Yes, you put in your credit card info. Yes, you CAN cancel it if you don't like it (but chances are you will love it and wonder what kind of strange garbage you have been brewing up in your coffee maker lately). No hassle, promise.

If you are like me and really like coffee, or you just want some free coffee...give them a try. After trying Tonx and realizing that you have been drinking crappy coffee most of your life, you might also start to question what other poor life decisions you have made.  I can't help you with that.

Give them a try, because if I like it...you know it has to be good 

https://tonx.org/430bc169

I like mine with my SoDelicious Dairy free Coconut Creamer.

Thanks for reading this weeks blog, fellow food lovers. 

Please eat good food this week,
-Caitlin

Tuesday, May 28, 2013

Going bananas

We have all been there.  We go to the grocery store, we buy some bananas thinking that we will eat them before they go bad.  Then you forget about them and they are sitting on your counter all brown, squishy and should probably be thrown away.

Don't. 

Bananas that are almost rotten are the best bananas for baking and freezing. 

It was Sunday morning and I found myself in this situation, bananas that sat neglected on my counter top all week.  I hate wasting food and I hate wasting money, so I got to work.

(side note: I also had very little food in my house because I had been avoiding grocery shopping.  What happened below required a bit of creativity.)

Mostly, I was hungry.  It was breakfast time and I had coconut creamer and some juice in my fridge.  Food was nowhere to be found.   I contemplated going to iHop, but then realized I hated wasting money again.

What could I do with bananas and what I had left in my cabinets?

Banana muffins. 

-1 1/2 cups all purpose flour ( I used 1 cup whole wheat flour, 1/2 cup homemade oat flour)
-1 1/2 tsp baking powder
-1/4 tsp baking soda
-1/8 tsp salt
-1 cup mashed bananas ( roughly 1.5 medium sized bananas)
-3/4 cup sugar ( I usually NEVER use white sugar, but I am trying to use mine up)
-3 tablespoons oil ( I used safflower)
-1 teaspoon lemon zest
-1/4 cup chopped walnuts, plus more for topping

Step one: preheat oven to 350 degrees, line muffin tin with liners or spray with non-stick cooking spray.

Step two: mix together flour, baking powder, baking soda and salt until combined.

Step three: mash bananas into bowl until smooth, add sugar, oil, and lemon zest.  Add wet mixture to dry mixture and stir to combine.  Add walnuts. 

Step four: fill muffin tins with muffin batter (roughly 2/3 the way full).  Top with chopped walnut.
Step five: Bake at 350 degrees for 20 to 25 minutes.  Allow to cool slightly before serving.

(While muffins bake feel free to sip coffee and watch half an episode of Doctor Who.)


My lovely bananas falling apart, 24 more hours and they would be garbage.

Too add nutrition and flavor, I made oat flour (which you can also buy) and used it in place for some of  the regular flour.  If you have a blender capable of doing this, I blend rolled-oats until they are a flour consistency.  I do this a lot.  It's one of my little 'clean baking' tricks. 

Dry ingredients to the left: flour, oat flour, salt, baking powder, baking soda.  And bananas.


Dry ingredients on left. Wet ingredients on right: sugar (yes, sugar is a 'wet' ingredient', lemon zest, safflower oil and mashed bananas.  I REALLY like adding a little bit of lemon juice or lemon zest to any recipe that uses banana. To me, banana has a weird taste on its own.  The lemon helps balance that out and adds a little 'pop' to the recipe.  I opted for zest rather than juice in this recipe as to not mess up the liquid to dry ratio.

Filled up 2/3 the way and topped with smashed walnuts.

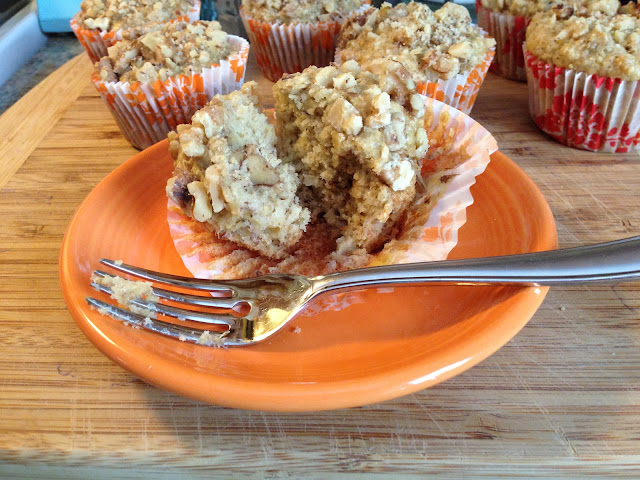
Fresh out of the oven mostly 'clean' banana muffins.  My kitchen smelled AMAZING.  Pair one of these muffins with some scrambled egg whites and call it breakfast!

The final product.  Warm, banana-y, fresh, nutty delicious homemade banana muffins. 


So, what do you do with the rest of the bananas? FREEZE THEM.  Bananas freeze extremely well.  I keep mine around for green smoothies.  Make sure you chop the banana into slices before freezing- or it won't freeze right.  I think green smoothies always taste a lot better when it has a really ripe banana added to it, this makes it so I always have a 'ripe' banana on hand for my smoothies. 
For more on green smoothies, check out my post here http://caitlineatsandbakes.blogspot.com/2012/03/green-smoothies.html 


I hope you enjoyed my mis-adventures into leftover bananaland!

-Caitlin

Tuesday, April 30, 2013

Peace, Love and Dairy Free (mostly...)

I'm always trying to find new ways to feel and look better. 

I knew that cutting dairy out of my diet was something that I hadn't tried and that I wanted to give a shot...but  never had the guts to follow through.

My skin was breaking out and not clearing up, I knew I had to change up what I was eating.  In particular, my forehead was breaking out. Which was not normal for me.  This was a sign of a digestion problem- slowly I have been cutting dairy out.

Now...before you start thinking I've gone crazy.  I still haven't cut out EVERYTHING.  I love cheese. I would eat cheese every day if I felt like it, so I still have cheese.  If you offered me ice cream, I'd still probably eat it. My general goal is to eliminate the things that I can easily substitute with non-dairy options, on a daily basis.

My biggest challenge was finding something to put in my morning coffee that could take the place of  half and half.  I had tried coconut creamer a few years ago, the French vanilla kind, but I just didn't care for the taste.  So, I went back to the half and half. 

I was at Whole Foods a little while back and I saw the same creamer- but there were different flavors available.  So Delicious Coconut Creamer- Original.  I bought it thinking "What the heck? If it works, awesome. If it doesn't, I'll just cook with it."


It ended up being just the thing I needed to eliminate the half and half from my morning coffee.  It is by NO means half and half, but it is 10 kCal per tablespoon and it is the best non-dairy option that I have been able to find.  ( and I am pretty sure I have tried them ALL.)

I've used this in my scrambled eggs as well, I use to throw in a touch of half and half- so i put a little of this in one day to see if it would still give a nice 'creamy' texture to the eggs.  It did.  No weird coconut flavor.

I have found this at Kroger and Whole Foods.  They have 3 different flavors: Original, French Vanilla, and Hazelnut.


My next obstacle was to substitute my 8 ounces of low-fat chocolate milk after I worked out.  I knew that this wasn't something that I could just get rid of, or my muscles would have a hard time repairing. I needed to find a non-dairy solution to my protein needs.

Enter: Sunwarrior Classic Protein (chocolate)


I was extremely skeptical about this stuff.  Again, my plan was that if I didn't like it, I would either send it back or use it to bake with.  I mix one scoop of this with 8 ounces of unsweetened chocolate almond milk in a blender bottle and 'shake it like a Poloroid picture.'  With other non-dairy proteins I've tried, its like drinking a mixture of sand in milk. Totally gross. 


This stuff is SMOOTH.  It has the texture of powdered sugar. Sunwarrior Protein is made from fermented brown rice protein, which is the difference between it and other brown rice proteins on the market.

Does it taste super amazing? No. It is tolerable, absolutely.  I have been using it for about 2 weeks now and have noticed that my stomach is less bloated and that I am looking a bit leaner.  The taste takes a bit of getting use to, but its well worth it. 

Bottom line? I have ordered another bag in the vanilla flavor to use for baking and smoothies at home.  I'll continue to order the chocolate to use after workout ( just because I feel like chocolate is a nice reward after a hard lift session).  Its not too expensive and it digests really well (aka no bloat or gas like with most dairy).  


Now...what can I use to put on my cereal and use for milk in my smoothies or baking? 

Blue Diamond Unsweetened Almond Milk

This is the stuff I like to mix my protein powder with.  I buy it when it goes on sale and stock up.  I always have a few in my cabinet, and a few in the fridge.  It is inexpensive and it has a good shelf life- also dairy free. I use the original or vanilla flavor on cereal or my smoothies- I keep the chocolate strictly for mixing with chocolate protein.  


Cutting out dairy can seem like a daunting task, it's not for everyone.  From my personal experience, making these small changes has left my skin 'glowing,' bags under my eyes are slowly going away and I have more energy ( possibly because my system isn't bogged down with trying to digest dairy all day).  I still won't give up cheese, it won't happen. 

Try substituting something you eat with a non-dairy option, notice how you feel, maybe taking some of the dairy out of your diet will benefit you as well.

Lots of love and coconuts,
Caitlin


***DISCLAIMER: I HAVE NOT BEEN PAID TO ENDORSE OR GIVEN ANY OF THESE PRODUCTS FOR FREE. THIS IS MY PERSONAL OPINION.***


Thursday, March 14, 2013

High protein, low carb, clean, turkey tacos

Sometimes I'm tired and I don't really want to cook dinner.  This is one of those 'go-to' meals that I cook when I'm not feeling like making something complicated.

Disclaimer: while I do post lots of things about sugary, salty, delicious junk food.  I don't eat like that all the time.  I eat as clean as I possibly can and try to limit my carbs and increase my protein.  This is just what works for me.  Everybody is different. Do what works for you.

Turkey tacos are a quick and easy weeknight dinner.  It doesn't take a lot of time and it doesn't cost a lot of money.  

Here's what you need:

-1 pound ground turkey
-Taco seasoning of your choice (I used Vann's Taco Seasoning, that I bought at Whole foods.  You could EASILY make your own Taco Seasoning- I just didn't feel like it.)
-Romaine lettuce (whole leaves)
-Cheese of your choice (I had goat cheese crumbles lying around, so that's what I used.)

Here is the ground turkey I used.  I don't like using red meat all the time, however, use any ground meat of your choosing.  I try to buy my meat when it's on sale, then I freeze it.  I'm always using ground turkey or chicken breasts, so it never goes to waste.

Add a bit of oil of your choosing, I used safflower oil, to the pan before heating.  Turkey is very lean and will burn to the pan without a little oil- but don't get crazy! Cook the ground turkey, it will turn white when it is cooked.  Since you brown ground beef, do you white ground turkey? haha  Anyways, after its cooked I added around a 1/3 cup of water to the cooked meat.  Then about 1.5 tablespoons of taco seasoning.  


This is what the taco seasoning I used had in it.  I bought it because it was already put together and didn't have any 'junk' in yet.  When this runs out, I'll probably blend my own together.

I think its cool to use the romaine leaves at 'taco shells'.  I used goat cheese crumbles to top it off.  Use what you have in your fridge.  Sometimes the best meals come happen by accident this way!
Turkey tacos, plated and ready to be eaten!  If you find this too messy, tear up the lettuce and throw it all in a bowl and make a salad out of it!  If I had tomatoes or peppers I would have thrown those in with this too.  But, its close to the end of the week and my fridge is looking a little empty.

I hope you enjoyed tonight's quick blog.  Healthy food doesn't have to be complicated!  Don't be afraid to experiment with food and discover something new.

You are what you eat, so eat the good stuff,
Caitlin

Monday, March 11, 2013

Things I would not want to live without: TEA

There is one thing that my friends and family members know that I love, that thing is TEA. 

My love for tea started when I was young.  I fell in love with the tea at Chinese restaurants and started drinking different types of tea (as opposed to Lipton black tea) when I was around 10 years old. I wanted to enjoy that same tea at home.  So, my parents bought me some oolong tea in tea bags for home use.  That sparked my tastebuds at an early age for a variety of different teas. 

At Holidays, rather than gifts, there were numerous occasions where I was given exotic loose leaf teas, cups, mugs, kettles and fancy sugars that you couldn't find in grocery stores.  Even now, when my friends or family go places- they bring me back cups, tea balls, different kinds of tea.  I have an entire section of my kitchen dedicated towards storage of tea, tea making vessels and kettles.  I am not joking when I say that I LOVE tea.

Random facts about tea:
  • Tea is the most popular drink worldwide, water being the most popular. 
  • Tea was accidentally invented in 2737 BC when Chinese Emperor Shen Nung spotted some tea leaves blew into a pot of boiling water and produced a pleasing aroma.
  • By 1800 England alone was consuming 24 million pounds per annum of tea of every type from white and green to oolong and black, all of it organically grown and hand-made, much of it fit for Emperors and kings. Most tea consumed in England between 1650 and 1850 was green and oolong - not black
  • An average of three billion cups of tea are consumed daily worldwide.
There are many different kinds of tea, the basics being: black, white, green, oolong.  All teas come from the same plant, Camellia sinensis.There are also herbal and rooibos teas, but those are not actually made from the tea leaf. 

White tea- is the lightest of all teas.  It comes from the bud of the tea leaves, the youngest leaves.  This kind of tea has the lowest level of caffiene and hightest level of antioxidants.  Good for skin and complection.  Brewing temperture of 160 degrees.

Green tea- is made from the same parts at white tea, when the leaves are a bit more mature.  Green tea contains between 5%-10% caffiene.  It can also help reduce cholesterol. Brewing temperture of 180 degrees.

Oolong tea- is a semi femented tea, this is the kind you come across in Chinese restaurants- usually a blend.  Oolong tea is a good digestive tea and is also linked to weight loss.  Brewing temperture of 190-200 degrees.

Black tea- this is probably what you grew up drinking.  This is the most popular tea in the US.  Black tea is fully fermented, containing up to 20 percent caffiene per cup.  Brewing temperture of 200-220 degrees.

Herbal teas and Rooibos tea aren't technically 'tea'.  Herbal teas can include chamomile, peppermint, herbs and other spices blended together for enjoyment or a medicinal purpose.  Rooibos tea, also known as red bush tea, comes from a plant native to Africa.  Rooibos tea is extremely high in antioxidants and boasts a sweet, red cuppa tea.  It has similar benefits to white tea.

Ok, so there are all these kinds of teas, but how in the world do you properly brew them?

You have a few options here.  Best case sceneario: you have loose leaf tea and a kettle with either a little basket for the tea or a tea strainer.  This is ideal because it allows you to immerse the loose leaf tea in the kettle giving the tea time to 'bloom'.  When the tea has room to move around, it will brew beter. 

I like to do this by getting my water ready (usually by electric kettle), warming the tea pot (let the hot water sit in there a few minutes) then dump that water down the sink.  I then add my loose leaf tea, whether directly to the pot or in a little tea basket.  I add a little water, enough to moisten the tea- then I give it a second to 'open up'.  Tea is dry, you are essentially rehydrating it when you add the water. By giving it a little dose of water before filling the pot- it can 'open up' better.  Thus creating a better flavor.  After the tea sets for 10 seconds or so, I add the remaining water to the pot and let it brew for the desired time.  Usually this is dictated on the package of tea or you can google on the internet


This is important (to me at least) take the tea out of the water! DO NOT let it sit there and steep for the duration of the time you drink the tea.  This not only burns the tea, but it causes tannins which will make the tea taste bitter.  The only exception in this is with herbal or rooibos teas.  The longer you steep those teas, the stronger the flavor and the higher the concentration of tea in the water. 

Ok.  Now for my favorite kinds of teas (in each category) and why I like them. 

White tea:  Silver needle, I get mine from Teavana.  I like this tea because it has no frills, no fancy flavors, just pure white tea.  It is a little earthy in flavor, but sweet and subtle at the same time.  I like to enjoy this tea before I go to bed, usually with a few piroline cookies.   http://www.teavana.com/the-teas/white-teas/p/silver-needle-white-tea


Green tea: ok, so this isn't technically a straight up green tea.  Pouchong tea falls somewhere inbetween green tea and oolong tea. Consider it a lightly oxidized green tea.  My favorite is Coconut Pouchong, from Golden Moon tea.  This tea was introduced to me by my favorite yoga teacher and healing lady extrodinare- Melita (hi Melita).  It tastes like the beach.  There is enough coconut flavor that you get the point, but its light and not overwealming.  http://www.goldenmoontea.com/coconut-pouchong.html


Oolong tea- Oolong tea will always be my favorite. I LOVE it with a ton of sugar, but I don't drink it that way very often.  My favorite comes from Golden Moon.  http://www.goldenmoontea.com/imperial-formosa-oolong.html 


Black tea- there are MANY different varieties of black tea out there.  Black tea has two purposes for me, and I like different brands and blends for those.  For hot tea, drinking by the cup I like PG Tips.  This is your typical, English style, blended black tea.  It is smooth without being bitter and they have a monkey as their mascot (who can't love that)? 

For ice tea, I will not brew anything besides Luzianne tea.  It is the perfect tea for your 'sweet southern tea' on a summers day, while sitting on your theorhetical porch in your therhetical rocking chair. 


I hope you enjoyed this little journey into the world of tea with me.  Broaden your horizons today and try a new blend or variety that you have never had before!